Angular: Modules and Components
Let's understand the functioning of the architecture of applications in Angular, and how modules and components relate to each other.
- Date

In today’s post, we will continue with the introduction to Angular. As we already know, Angular is a framework dedicated to building web applications on the client side, which means that the behavior and rendering of our “web app” are handled by the browser.
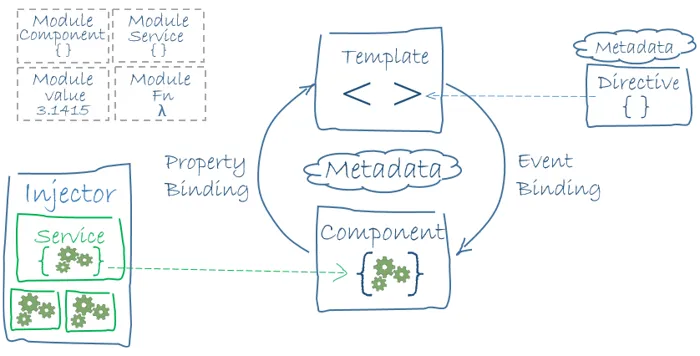
Let’s take a look at a diagram illustrating the architecture of Angular and how different elements relate to each other.

To understand this diagram, let’s classify the elements that make up Angular into three main blocks:
- Modules: NgModule
- Components: @Component, Template, Directives, Data-binding, etc.
- Services and Dependency Injection: @Injectable, Routing, etc.
In this post, we will focus on the first two blocks.
Modules
Angular modules (NgModules) are quite different from JavaScript ES6 modules, although we’ll also use the latter to manage library imports.
As we know, Angular applications are modular, meaning they consist of various independent blocks, each of which contains a part of the application or a set of its behaviors.
Every application should have at least one NgModule class, usually named AppModule, and its file is typically named app.module.ts.
// ES6 imports
import { NgModule } from '@angular/core'
import { BrowserModule } from '@angular/platform-browser'
import { SomeProvider } from './providers/some_provider'

@NgModule({
  imports: [BrowserModule],
  providers: [SomeProvider],
  declarations: [AppComponent],
  exports: [AppComponent],
  bootstrap: [AppComponent],
})
export class AppModule {}
This would be an example of the root module of an Angular application. We import libraries using JavaScript and encapsulate them within the @NgModule decorator. As you can see, the decorator has a set of metadata or properties. Let’s define the most important ones; you can find the rest in the official Angular documentation.
- declarations: These are the components, directives, and pipes that belong to this module.
- exports: A set of “declarations” that need to be accessible for component templates from other modules.
- imports: Modules exported by other classes that require the components from this module.
- providers: Services created by this module that can be used globally in the app.
- bootstrap: Defines the main view of the application. Only used by the root module.
Components
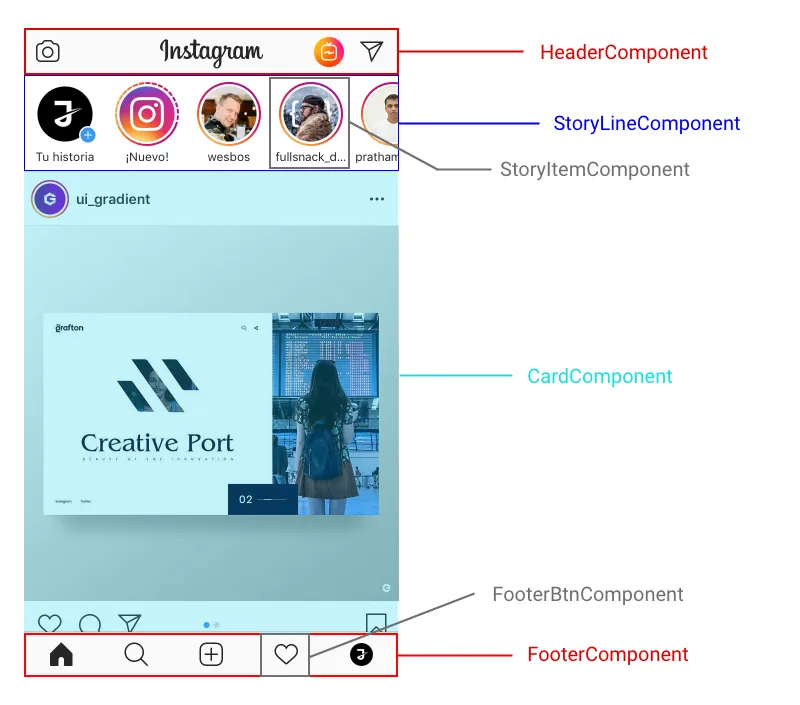
A component controls an area of the screen called the view. A component is a JavaScript (ES6) class with the @Component decorator.
Let’s take a look at a real example of what a component is. For this, we’ll take a screenshot from Instagram and break it down into different components.

A component includes properties and methods available for its template, but it’s important to be aware that not all logic should reside in this class. We should include everything related to the controller of the view in this class and abstract all other methods into services that will be injected later.
Let’s take a look at the code of the AppComponent, which is our main component in our “FirstProject”.
import { Component, OnInit } from '@angular/core'

@Component({
  selector: 'app-root',
  templateUrl: './app.component.html',
  styleUrls: ['./app.component.css'],
})
export class AppComponent implements OnInit {
  title = 'First Project'

  constructor() {}

  ngOnInit() {}
}
First, let’s talk about the metadata of the @Component decorator.
This example showcases some of the most important and commonly used attributes:
- selector: This is a CSS selector that instructs Angular to create an instance of this component when it encounters a tag with that name in the HTML. In this case, when Angular encounters
<app-root></app-root>, it will insert an instance of this component. - templateUrl: This is the URL where the template you want to bind to this component is located.
- styleUrls: An array of URLs to style files (CSS) that will be applied to our component.
You might also wonder why the class implements the OnInit interface. This is related to the lifecycle of Angular components. In this case, the ngOnInit method inherited from that interface will be executed when the component is created. In this post, we won’t go into detail about the lifecycle; we’ll cover it in depth in an upcoming post. Here’s the documentation for the curious ones 🤔.
Template
The template is responsible for defining the view of our component. In the case of Angular, it’s a traditional but enhanced HTML with a set of expressions and directives that improve its behavior and make our lives easier.
In a component’s template, besides the regular HTML tags, you can find other distinct elements that Angular uses.
*ngIf*ngFor(event)[property]<component></component>
In upcoming posts, we will analyze each of these in detail. For now, let’s take a look at the template of our main component in “firstProject”.
<h1>My First Project: {{title}}</h1>
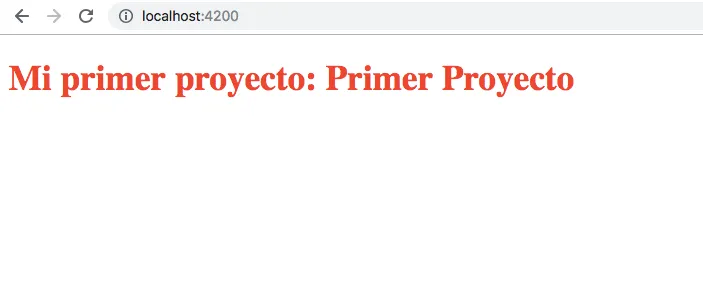
We execute the command ng serve in our terminal to see the result, and we would get the following:

We can see that it has inserted the value of the “title” variable from our component into the DOM. In Angular, this is called “interpolation,” and it’s very useful for creating web applications using this wonderful framework.
In the upcoming posts, we will discuss more about the syntax of the template and learn while programming a web application for a to-do list. After all, the best way to learn programming is by programming, if you’ll pardon the redundancy 😄.
See you here again soon, greetings everyone ✋.

